A photograph captures a moment in time. A GigaPan is often presented as capturing a single moment, but
One of the most distracting things is when people move between frames. Often there will be a reasonably complete image of a person in the space where two or four images meet. If the person has moved the Stitch program tries to blend the different views into one view. Sometimes this is an entertaining effect, but mostly it is simply distracting.
The most frustrating are the images where there is a good image of a person on one of the pictures, but it is being obscured by another image. Wouldn't it be great if you could just make the 'extra' images go away? Read on for a simple way to fix (some) of these GigaPans.
The simple way to make the Stitch program ignore something is to take it away. So the essence of this technique is to simply delete the parts of the person which are confusing the stitcher. But normally if you erase part of a JPG image you get a white, or black, area in the picture - which just messes up your image more.
So the trick is to create a transparent layer in your image, and then save the image in a format other than JPEG, like the PNG format, which supports transparency.

Here is a sample image. There is a certain charm to some of these distortions, but perhaps a more realistic depiction is desired...
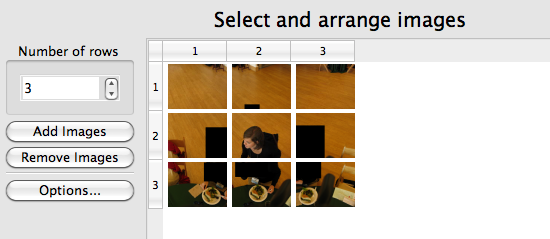
First look at the images in the 'Select Images' tab. If you hold your mouse over an image it reveals the image name.
You want to identify the images which overlap to include your subject.
Then open these images. I am going to use The Gimp program in this example. The Gimp is an open source image editing program. It runs on Mac, Windows, and Linux, and because it is open source everyone can download it for free.

The image below this includes an unfortunate movement, and an overlap of the subject.
We add a transparent layer by going to Layer->Transparency->Add Alpha Channel
Then use one of the select tools to select
the area which we want to get rid of.
The lasso tool is likely your best bet, but depending on the details in the subject the Rectangle Select may be fine.

The area you selected is replaced with a light and dark grey checkerboard pattern as a marker that this is now transparent.
Save the image in PNG format by File->Save As, and then select 'PNG' format. There is a dialogue box, but for now accept the defaults and save the image.
I use the original image name, in this case 'IMG_3843', but the extension is changed to PNG. This means that you have two copies of the image - the original (most likely) JPG, and the new image.
Repeat this process for each image which has a bad view of your subject.
1. Layer->Transparency->Add Alpha Channel
2. Select the area to remove.
3. Edit->Clear Make sure you get the checkerboard pattern. If you get an empty white area it means you didn't do step 1.
4. File->Save As and change the extension to PNG
Now back to the Stitch program! Select Add Images and add all of the images with a png extension. This is easier if you click the 'date modified' column so that the newest images are shown first - since you just edited the png files they will appear first.
Finally, remove the original JPG files which are now repeated by the PNG's. You will get images with black holes in them - but that is okay. The Stitch program knows that these are areas which are transparent, so it will not use the information from the transparent area during the blending process.

So save and stitch the panorama, and you should have a much improved image!
There are still some artifacts in the stitched version of my example, but at least it doesn't look like a Picasso painting.
(not that there is anything wrong with Picasso!)
Happy stitching, and if you have questions, or a better way to do this, please let me know!
There are still some artifacts in the stitched version of my example, but at least it doesn't look like a Picasso painting.
(not that there is anything wrong with Picasso!)
Happy stitching, and if you have questions, or a better way to do this, please let me know!